Thursday, June 19, 2008

Apron Card

This is another fantastic card made with the "Tart & Tangy" stamps set. I just love this set! Remember to get your own "Tart & Tangy stamp set, you have to order it by the end of June! I love the "Summer Picnic" decorative paper that matches this set too. This Apron card is one that we made at my "Tart & Tangy" Technique class earlier this month. I cased the original card and it can be found here on Linda McClain's wonderful blog site, LMac's Catered Crops. She has a hand drawn pattern for this card on her link. I think this card would be great for a recipe swap or an invitation to a party of some kind, don't you? I just love it! What do you think?

Card Recipe:


  • Stamps - Tart & Tangy
  • Papers - Bashful Blue, Old Olive and Whisper White Card Stocks, Summer Picnic Designer Series papers
  • Inks - Real Red and Old Olive Stampin' Write Markers
  • Embellishments - Old Olive Polytwill ribbon, Red Gingham ribbon and Bold Bright buttons
  • Tools - 1/8" Hole punch, Rounded Tab punch, Scallop punch, 1 3/8" Circle punch, 1 1/4" Circle punch, Corner Rounder and Crystal Effects

Thanks so much for stopping by today! I will be very busy the next few days getting ready for my "Mystery Hostess" party so I may not post again until it is over! It is one of my favorite events that I hold! Everyone seems to like it too! Door prizes all around!

Happy Stampin'

Karen

Wednesday, June 18, 2008

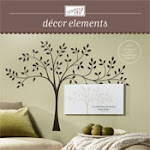
Decor Elements


I'm so excited to announce that Stampin' Up! is introducing a new product line called "Décor Elements". What is this new product? It is a line of wall art using Stampin' Up! designs made from vinyl used to decorate your home. They are self-adhesive vinyl wall decorations that can be used on walls, windows, plates, vases, mirrors, picture frames - anything the vinyl will cling to! The possibilities are endless! They coordinate with Stampin' Up! stamps so that you can personalize your home combining these two elements and creating beautiful handcrafted home decor pieces that make a statement and make it uniquely yours. These vinyl wall decorations are easy to apply and to remove.
This exciting new product line will be available to customers on July 1st. I can begin accepting orders for these products then. I will have brochures available in the next week or so. Please email me if you would like one. I'd be happy to get one to you!
I can't wait to order some of these products for myself! I can think of many areas in my home that they can be used. How exciting!
Thanks for stopping by!
Happy Stampin'
Karen

Tuesday, June 17, 2008

Thanks For Our Teachers!

This is a card that I had made back in April for a group of teachers that I was working with. I had seen versions of this card on a few sites that I visited but the original card can be seen here on Carol Frerichs site. She has so many great samples to see. The card she made is a 4 x 4 square card but I made mine a standard greeting card size. I thought that this would be perfect to do with my group of teachers. The technique for this card is called the chalkboard technique. This is a neat technique that I had wanted to try. I had originally seen the directions for this technique at SplitCoast Stampers. The tutorial is by the ever talented Beate Johns. The link to the tutorial at SplitCoast Stampers is here.
What you do is stamp the solid image with the white craft ink and then use sponge daubers to add the pastels right on top of the stamped images. The chalks adhere to the ink. You then use the swiffer cloth to remove the chalks from the areas around your stamped image where you don't want the chalk to be. This is a really fun technique to do and a very simple card to put together.
I also made one of these cards for my daughter's preschool teacher as a "thank you" during teacher appreciation week in May. She really liked it.

Card Recipe:

  • Stamps - Tart & Tangy and Phrases for a Friend
  • Papers - Basic Black, Whisper White and Old Olive card stocks. Summer Picnic Designer Series paper
  • Inks - Basic Black Classic Ink pad and Whisper White Craft Ink pad
  • Embellishments - Vintage Brads, Old Olive Poly-twill ribbon, Red and Black Gingham ribbons
  • Tools - Stampin' Pastels, Sponge Daubers and a swiffer cloth

I hope you like this card. You should try this technique out for yourself and let me know what you think about it. It is really very easy to do.

Thanks for stopping by!

Happy Stampin'

Karen

Monday, June 16, 2008

Kind Thoughts

Here is the card I would like to share with you today. I'm thinking kind thoughts for all of you that are stopping by my blog for a visit. This is a card that we did at one of my club parties last month. It kind of has a little bit of an Asian look but it is also elegant, don't you think so? It is made of neutral colors. I like it a lot. The large circle that the flowers are stamped on was made by using the Coluzzle tool and then trimmed on the edge to fit on the card.
Card Recipe:

  • Stamps - Kind Thoughts and Embrace Life
  • Papers - Sahara Sand, Basic Black, and Whisper White card stocks. Basic Gray Textured card stock
  • Inks - Basic Gray and Sahara Sand ink pads. Sahara Sand and Blush Blossom Stampin' Write markers
  • Embellishments - White Taffeta ribbon and Dazzling Diamonds glitter
  • Tools - Coluzzle Cutting System, Two Way glue pen, Stampin' Sponges and Stampin' Dimensionals

Thanks for stopping by my site. Be sure to leave a comment and tell me what you think about this card. Kind thoughts for you...let's go stamp!

Happy Stampin'

Karen

Sunday, June 15, 2008

Happy Father's Day

This is the card that I made for my Dad for Father's Day! He really seemed to like it and I'm so glad because I really enjoyed making it for him. I love to use stamps that have "line" images and then use ink pads or refills and Aqua Painters to color in the images and give it that nice water coloring look. It gives me the feeling of painting without actually painting. It is that soft look that I like, don't you?

Card Recipe:

  • Stamps- For Father
  • Papers- Creamy Caramel, Old Olive, Chocolate Chip and Very Vanilla card stocks
  • Inks-Basic Brown, Real Red, Old Olive, More Mustard, Creamy Caramel, Chocolate Chip, Really Rust and Blue Bayou Ink pads
  • Embellishments- Kraft Taffeta ribbon
  • Tools- Stampin' Sponge and Aqua Painters

I'm going to be busy this week getting ready for my Mystery Hostess party which is on Saturday. I've got a lot to do to get ready! I'm on the lookout for some great "summer lookin" projects to do so if you see any anywhere that you think I might like to do, let me know...just leave me a comment! If you haven't RSVP'd for my Mystery Hostess party yet...hurry and do so! If you would like to have more info about the party, email me!

Did you stamp any this weekend? I hope so!

Thanks so much for stopping by.

Happy Stampin'

Karen

Retiring Stamp List!!

Call me crazy but I couldn't help myself! I couldn't go to bed until I saw it! (Karen's body arguing with her mind:((But I'm so tired! I need sleep. Maybe I should go to bed))...nah! Sleep? Who needs sleep!? There are stamp sets in jeopardy!!) Crazy right??
Okay, so I did stay up until 2:00am so that I could get a look at the retiring stamp list! I'm already marking the ones I need to get and the ones that I need to sell. This is important stuff!! Click Here for the link so that you can see it too!
Contact me to place your order before time runs out! Yikes! We have until August 10th to order those sets that we can't live without! Don't forget!

Thanks for stopping by!

Happy shopping!
Karen

Thursday, June 12, 2008

Tart and Tangy Class Samples

Here is another sampling of what we made at my Tart & Tangy Technique Class this past weekend. Not only did we make 3 cards using different techniques but we also made this set of 6 greeting cards with a gift box to hold them. The cards and the box are fairly simple to make. The general idea and the box itself I cased from the very talented Nancy Riley at iSTAMP. She has so many great ideas and samples on her blog. You can view her Tart & Tangy class samples here . She got her idea for this gift set from another very talented demonstrator Jackie Pedro at The Scalloped Edge . You can view her class samples here . She also has wonderful samples on her site. I have both of these very talented ladies listed on my blog list and I visit their sites often. On both Nancy's and Jackie's site they have posted a link to the box directions that were originally from Holly McMillen. I think it is great that talented people are willing to share ideas with one another.

Gift Set Recipe:

  • Stamps- Tart & Tangy
  • Papers- Bashful Blue, Real Red, Old Olive, Pumpkin Pie and Whisper White card stocks. Summer Picnic Designer Series papers
  • Inks- Pumpkin Pie ink pad and Old Olive and Real Red Stampin' Write markers
  • Embellishments- Real Red and Bashful Blue Striped Grosgrain ribbon and Earth Elements Brads
  • Tools- 1-1/4" Circle punch, 1-3/8" Circle punch, Scallop punch, 1/16" hole punch, Sticky Strip and dimensionals

I have a couple of other cards to share with you from this Tart & Tangy Technique class but I'll save them for another day. I hope you enjoyed seeing this gift set. Just think of the nice gift card sets you could make using this idea but changing the stamp sets! The possibilities are endless!

Thanks for stopping by today!

Happy Stampin',

Karen

Wednesday, June 11, 2008

Feelin' Fruity?

I thought I would share one of the cards we did this past weekend at my Tart & Tangy Technique class. It features the "Scratch and Sniff" technique. It can be a lot of fun to do. This card also uses more of the "Summer Picnic" Designer paper, which I love. (Remember it is only available through the end of June!)


To give your cards a little scent, mix 1 teaspoon unsweetned (sugar free) drink mix like Koolaid to every 1 1/2 teaspoons of clear embossing powder to get your scented powder that you will heat. All you do is stamp your image with VersaMark ink on your card stock ( a solid image works best ) and then sprinkle on your scented embossing powder, shake off excess and heat with an embossing heat tool. You can also use a powdered sugar free coffee creamer, unsweetened (sugar free) cocoa or a spice like cinnamon or oregano. You could come up with all kinds of scented cards this way! What fun!
Card Recipe:

  • Stamps- Tart & Tangy
  • Papers- Pumpkin Pie, Old Olive and Whisper White card stock, Summer Picnic Designer Series paper
  • Inks- Wild Wasabi, Yo Yo Yellow and Pumpkin Pie Classic Ink pads. VersaMark Pad
  • Embellishments- Pumpkin Pie Striped Grosgrain ribbon and scented embossing powders
  • Tools- Embossing Heat Tool and Stamp-a-majig

I haven't tried any other scented cards yet. Just the Lime, Orange and Lemon scented one using Koolaid. I think a chocolate scented card would be yummy! What about a scented hot chocolate card? Or peppermint? Especially when it gets closer to Christmas! I'll have to give those a try.

Thanks for stopping by! I hope you enjoyed this card!

Happy Stampin'

Karen

Tuesday, June 10, 2008

To Have and To Hold

Since June is the traditional month of weddings, there are usually lots of weddings to be expected. I just love this wedding stamp set "To Have and to Hold". It has simple lines with a touch of elegance. It is just calling for some vellum paper and lots of glitter!


This card we made at one of my club groups last month. We had a wedding theme party and even had a mini wedding cake! It was great! We stamped our projects while we watched the movie "27 Dresses" on DVD! I just love that movie, don't you? If you've not seen it you should! It is so cute! There are so many great "wedding" theme movies we could have picked to watch; "The Wedding Planner, Runaway Bride, The Bachelor, Father of the Bride" so on and so on..., but "27 Dresses" was the latest wedding movie out and not everyone had seen it! Anyway back to the card; I knew that I wanted to use vellum in some sort of way and also lots of glitter. This is what I came up with. I hope you like it...the ladies in my club all seemed to. The vellum on the front of the card is held in place in the center of the card and the "Bride & Groom" are stamped on white card stock and mounted on the Basic Gray piece then placed over the vellum. The ribbon on the side helps hold the vellum down at the edges.

Card Recipe:


  • Stamps- To Have and to Hold

  • Papers- Whisper White, Basic Gray and Vellum paper

  • Inks- Basic Black and Basic Gray ink pads. Going Gray, Basic Black, Blush Blossom, Pretty in Pink and Close to Cocoa Stampin' Write Markers

  • Embellishments- Whisper White Taffeta ribbon and Dazzling Diamonds glitter

  • Tools- Ticket Corner Punch, Two Way glue pen and dimensionals

We also made a couple of other cards at this club party which I will post later. One of them was a gift card holder that I learned how to fold and make at a SU regional seminar that I attended in Orlando recently.

Thanks for stopping by today! Let's go stamp something!


Happy Stampin'

Karen

Monday, June 9, 2008

"Cherries Jubilee"


Okay, SO this isn't Cherries Jubilee but the card does have cherries on it! They are so very yummy looking...and they make me happy. Kind of reminds me of summertime! This card showcases the cherry stamp out of the Tart & Tangy stamp set which is still available for purchase till the end of June. I also added a little shine on the main image with the Crystal Effects. I don't think you can tell that from the photo.
I just love this Tart & Tangy stamp set and the Summer Picnic Designer Series papers to coordinate so well with it! It is such a fun set to use! I just had a class this past weekend that featured this stamp set and everyone who attended received this set as part of their card kit. Maybe I'll post some of those card samples that we made sometime later this week. Here's what I used for this one. Enjoy!

Card Recipe:
  • Stamp Set- Tart & Tangy (From Occasions Mini catalog)

  • Papers- Real Red, Basic Black, Old Olive and Whisper White Card Stocks. Summer Picnic Designer Series Paper
  • Markers- Real Red and Old Olive

  • Embellishments- Real Red Striped Grosgrain Ribbon

  • Tools- White Gel Pen, 1 1/4" Square Punch, 1 3/8" Square Punch, Crystal Effects and Dimensionals

I would like to say thanks to everyone for the kind comments about my blog. It is a learning experience for me. I hope that you enjoy it as much as I am enjoying it! I hope to add a calendar link soon so that you can view my upcoming class schedule and see what things I offer in the way of "Classes by Mail" too. Please be sure to leave me a comment about my blog and this new card and feel free to contact me with any questions you might have!


Happy Stampin'


Karen

Sunday, June 8, 2008

Welcome!

Hello! Welcome to my new blog site. I can't wait to share my stamping passion with you. I've really wanted to do this for a while so here goes! I hope to update frequently but please be patient with me as I am learning to use this site. This will be my place to share with you my latest creations and ideas. I hope you enjoy them and I hope to even inspire you a little bit. I look forward to sharing with you the links to blogs of the many very talented stampers out there that I love to visit too! I'll share my class schedules and events with you, as well as specials from Stampin Up! I will have some classes and kits available for you to do "by mail" if you aren't able to attend in person. I might even have things available for purchase from time to time. Enjoy!

This is my first card that I will share with you. I made this one a while back but it is one of my favorite ones. It has a simple but elegant look to it, don't you think? I love this color combination too. This card features one of the exclusive "Two Step Stampin' sets" from Stampin' Up! I colored the base flower stamp with markers and before I stamped it onto the card stock I "huffed" it to ensure that the coloring from the markers were still moist. I did the same thing with the overlay flower stamp too. I used the color spritzer tool to add the "speckles" to the card stock. **A helpful hint on using large background stamps is to ink up your large stamp then place it on your stamping surface "face-up" then take your card stock and place it "face-down" onto the stamp. Being careful not to move the card stock, rub the back of the card stock with the palm of your hand or use a bone folder to pick up the ink color evenly onto your piece of card stock.**


Card Recipe:

  • Stamps- Floral Background, Heartfelt Thanks and various word stamps.
  • Papers- Elegant Eggplant, Almost Amethyst, Mellow Moss and Very Vanilla
  • Inks- Almost Amethyst pad, So Saffron, Mellow Moss, Almost Amethyst, Elegant Eggplant and Old Olive Stampin' Write markers.
  • Embellishments- Vintage Brads and Elegant Eggplant 1/4" Grosgrain Ribbon
  • Tools- Color Spritzer tool and Slit punch
Please feel free to leave a comment and tell me what you think! I'd be happy to answer any questions you might have as well! I look forward to hearing from you!


Happy Stampin'
Karen