Showing posts with label Designer Series papers. Show all posts

Monday, September 29, 2008

Okay...You Can Believe Me This Time!

Hello again everyone! This time I am back to blogging, I promise! I have my photo program on my computer now so I can add pictures again to my posts. I just don't like posting things without pictures it just doesn't seem right to me! I wanted to take this time again to say "thanks a bunch" for being patient with me and my computer woes. Not only have I had all of the difficulties with my computer but there has been so much going on this month in my personal life. My husband was in the hospital for a few days due to a pain in his arm. The doctors thought he might be having a heart attack due to an abnormal EKG they did. Fortunately, he did not have a heart attack. His blood pressure was very high so they got that under control and of course they did a whole battery of tests and blood work while he was there. We found out that he has Diabetes, although he seems to be in denial about that right now and they found out that the pain in his arm is due to a bulging disc in his back. He will be going to see a a specialist about his back and also will be visiting the Diabetes Center here in Tallahassee for classes to learn about how to control his diabetes. He has been put on medicine for that and he is to monitor his blood for right now. Prayer for him to have total understanding about his situation would be much appreciated!
Okay, now let me tell you about this card I have posted. This is one that we did at a recent club party. My friend Judy was the hostess and she just loves that Sock Monkey stamp set so we had to use it! I got the idea for this card from several places but it mainly came from a card that I saw on the Stampin' Up! demonstrator web site. I just changed it up a little.
Card Recipe:

  • Stamp Set - Sock Monkey
  • Papers - Kraft, So Saffron, Kiwi Kiss, Chocolate Chip, Summer Sun and Whisper White card stocks. Bella Rose Designer Series paper
  • Inks - Basic Brown ink pad, Summer Sun, Close to Cocoa, Creamy Caramel and Pretty in Pink Stampin' Write markers
  • Tools - 1 1/4" Circle punch, 1 3/8" Circle punch, Scallop punch, 5 Petal Flower punch and Scallop Edge punch. Stylus tool, Paper Piercing tool from the Crafter's Tool Kit and dimensionals.

Happy Stampin'

Karen

Tuesday, August 12, 2008

New 2008 Fall & Winter Idea Book & Catalog!

Well here is the much awaited new Fall & Winter Idea Book & Catalog! Isn't the cover just so beautiful? You can click here to download a copy of the catalog or click the catalog icon on the left side of my blog. As of right now Stampin' Up! has decided not to have an on-line link to the catalog as they have in the past. I'm not sure why they have decided to do this but it might have something to do with the fact that they will have FULLY AUTOMATED ON-LINE ORDERING COMING SOON. Whoo Hoo! From what I have heard, Stampin' Up! will be transitioning to a fully automated one-step on-line order (shopping cart style) in the near future which will make your ordering process incredibly easy. How cool will that be? I will have the feature available on my blog as soon as it's released. In the mean time, you can either download your copy and save it to a CD or your computer. If you would prefer a copy of the catalog you can hold in your hands there are several ways to obtain one. You can host a party and earn one FREE or you can join a stamp club and earn one FREE or you can purchase one from me for $9,95. Contact me for more information or to purchase your copy!


Stampin' Up! has several wonderful promotions going on right now that I want to share with you. First of all they have new sets from the catalog priced at a 15% discount!! Can you believe it? Click here
to view the details! Contact me to place your order now through September 30th!


Then Stampin' Up! is offering NEW $99 MINI STARTER KITS!! For a limited time (Aug. 11 through October 11), Stampin' Up! has made becoming a demonstrator even more attractive by introducing three new $99 starter kit options. Click here to see the $99 Starter Kit contents and details. Stampin' Up! is also offering a FREE STAMP SET of your choice with the FULL SIZE STARTER KIT that is $199. Sign up for the full size kit by October 11 and receive a Free Stamp Set of your choice as a bonus (up to a $47.95 value). You can sign up online here but be sure to email me first to get my special password that allows you to sign up online!

What are some of the benefits of becoming a demonstrator? Here are just a few:

  • You will receive 30% off your first order that you place!
  • Get 20% off all orders (and potentially more based on sales totals)
  • Receive Stampin' Up!'s monthly exclusive demonstrator magazine, Stampin' Success!
  • Earn free stamp sets through a bonus program called Stampin' Start
  • Have exclusive access to the Stampin' Up! demonstrator web site
  • Get online training through teleconferences
  • Earn products and even VISA gift cards through a rewards program called Great Rewards!
  • Be able to pre-order select Stampin' Up!'s stamps, tools and embellishments!
  • Be part of my great demonstrator downline team and attend monthly meetings!
  • Attend fantastic demonstrator only events through Stampin' Up!
  • Be inspired by video tutorials and project ideas on the Stampin' Up! demonstrator web site
  • Have your own business web site to list your events and classes for only $12.95 per month
  • Best of all, meet new people and make lasting friendships through customers and fellow demonstrators

There is no obligation to hold workshops/parties or even sell Stampin' Up! products at all with the purchase of the starter kit. It's yours to use and enjoy. If you do decide you want to remain an active demonstrator and be a part of my team, just a minimum of $300 in product sales per quarter is all you need to do. Please contact me for more info! I'd love to have you as a part of my team!!

Finally I want to share with you a card that I have made using new colors, papers, stamps and tools! I just love new set of paper! The paper is called Bella Rose and the set is Dreams Du Jour! The scallop edge on this card is made by the new scallop punch pictured below!


Card Recipe:
  • Stamp Set: Dreams Du Jour
  • Papers: Riding Hood Red, Kiwi Kiss, Pink Pirouette and Whisper White card stocks and Bella Rose Designer Series Paper
  • Inks: Basic Black ink pad, Riding Hood Red, Kiwi Kiss, Pink Pirouette ink refills
  • Embellishments: Vintage Brads and Pretty In Pink Taffeta Ribbon
  • Tools: Scallop Edge Punch, 1/8" hole punch, Aqua Painters and dimensionals

What do you think of this card? I do just love it! The punch is so very easy to use too! I love it so much! We will be trying it out this weekend at my NEW CATALOG Open House! Can't wait for you to get you hands on it!

Here is all you have to do to use the new punch. Punch the card stock once then move it down and line it up with the scallops that are printed on he punch itself. Continue to punch until you have the desired length of the card stock finished. It also punches off a skinny strip of card stock that can be used as embellishment too.

I have seen so many neat ideas made using the punch. If I can remember where I've seen them, I'll post links to them to share with you!

This post was very long today but I have so much to share with you! I'm so glad that you stopped by! I'll be showing more samples that I have made using other sets this week. I'm going to go get busy stamping some more now!

Happy Stampin'

Karen

Wednesday, August 6, 2008

Nugget Box Tutorial and Blog Candy!

So here is the post for the nugget candy box. The items shown to the left are what I used to create the box. I hope that you will be able to understand my tutorial. Refer to the pictures as you read the directions. Hopefully that will help you.

Box Base:
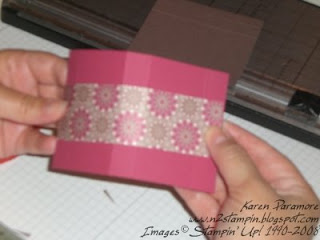
Begin with a piece of card stock cut to 3 3/4" x 5 1/4". Score it at 1/2" on all four sides and then score it again at 1 1/8" on all four sides. Cut in to the score marks on the two longer sides leaving tabs as shown in the picture below. Be sure to trim tabs at an angle because this makes them easier to work with. You will have four tabs, two short ends and two longer ends when you are finished trimming your box base. To assemble it, apply Sticky Strip to the base as shown in the picture below. Fold tabs in and attach to the longer sides of the box base and fold all sides down on scored lines to be stuck on the sticky strip pieces. This will complete your box base.

Slider Cover:
Cut a piece of card stock to 3 1/8" x 5 1/8". I used textured card stock for mine. Score this piece at 2 1/4" and then 4 1/2". Turn card stock piece around 180 degrees and score again at 2 1/4" and then 4 1/2". Adhere the designer paper piece that is cut 1 1/2" by 5 1/8" to the scored card stock piece. Using sticky strip, adhere one side flap to the other to create a rectangle shape open ended slider for your box base.


Cover nugget candy with a piece of designer paper that measures 1" x 3 1/4". This box size will hold 3 nugget candies. Place the candies inside the box and slide the slider cover onto the box. To finish it tie with a piece of grosgrain ribbon. What a nice gift this is to make! It makes even simple chocolates seem so very special!


Now onto more candy! I want to announce my very first blog candy give away! In honor of my site reaching 1000 hits and to thank you for your support, I want to have a very special drawing! To be entered into the drawing, please leave a comment on this post telling me what you like to use stamps for the best. Is it for making cards, scrapbooking or making 3-D items like the nugget box I just showed you. In order to be considered in the drawing you must leave your complete name, where you are from and your email address on your comment. Please leave your comment by the deadline date of this Saturday August 9th. I will pick a lucky winner through random .org on Sunday afternoon, August 10th and will announce the winner in a post so be sure to check back. Below is a picture of the blog candy that you could win! This is over $50.00 worth of Stampin' Up! products! Can you say Whoo Hoo? Don't forget to leave your comment by Saturday night at midnight! Let me know what you thin about my first tutorial too!

Good Luck! Thanks for stopping by!

Happy Stampin'

Karen

Tuesday, August 5, 2008

Hostess Appreciation!


My annual hostess appreciation event was so much fun on Saturday! I did a "Fiesta"theme! We had delicious food, played lots of games, there were tons of door prizes, of course stamping but it wouldn't have been complete without a pinata full of treats! Right? Everyone scrambled to fill their bag with goodies when the pinata was opened! It was such a fun day! Everyone enjoyed the projects we made as well! "Thank you ladies for making the day so special for me!" "I love and appreciate you all so much!": )
I have a customer and dear friend named Cherith who is going to be moving away soon and I'm really going to miss seeing her. She is the lady in the very first picture at the top of this post wearing the white blouse! She has been my customer from the very beginning, when I first signed up to be a demonstrator. She was a guest at my very first workshop! Cherith teaches Spanish and since she will be leaving me soon, I presented her with a small gift. Included in the gift, I gave her a new stamp set called "Wow Flowers" but gave her the Spanish version of it! She loved it! It is so neat that Stampin Up is now going to have a whole catalog in Spanish!
These are the projects that we made!
I love the 4 x 4 sized cards now so we made a couple of those and we even made a candy nugget treat box to go with one of the cards. I wanted to use stamp sets that would soon be retiring so I chose the wonderful "Polka Dots & Paisley" set and I chose the "For a Friend" hostess set too. The decorative papers are also going to be retired. I used the "Berry Bliss". It is one of my favorites!
I can't wait to see the new catalog and all of the new papers they have for us! I should have the new catalogs by this weekend...I hope anyway! Remember that you have until August 10th to order any of the things that are retiring from the current catalog! Contact me to get your order in soon!
We also made a card using the stamp set "Friendly Flowers" which was in the last mini catalog we had. I had ordered the set and realized that I never used it! Not even once...how sad is that? So I decided to use it even though no one could order it. Maybe it will show up in the new catalog! I'm not going to post a card recipe for these cards but I am going to post the directions for the nugget box and include pictures on where to cut it and where to glue it. I'll try to post that later today! I also have reached over 1000 hits on my blog so I'll post info about that on my next post as well! I have a great hostess stamp set bundle to give away! How Fun!
Thanks for stopping by! I hope these samples have inspired you to go stamp something!
Don't forget to stop by later today for directions on the nugget box and to find out how to win my blog candy give away!
Happy Stampin'
Karen

Monday, July 28, 2008

Circle Of Friendship Notes Gift Set

Happy Monday to you!

Today I wanted to share with you these wonderful little 3x3 note cards and a gift box to put them in! Wouldn't these make a neat gift for someone? They are so super easy to make too. I used a combination of papers on mine. Mainly the Cutie Pie paper but also a little bit of the Afternoon Tea paper because it went so well with the Soft Sky card stock and the Blue Bayou that I used too. The Afternoon Tea paper is no longer available because it was in our last mini catalog.


The Cutie Pie paper and the two blue colors of card stocks are all going to be retired as of August 10th. The stamp set that I used will also be retired then too. It is called "Circle of Friendship". If you are interested in purchasing any of these products, send me an email and I would be happy to order them for you!


There are 6 mini 3x3 cards and envelopes and the box is just made out of card stock. The box bottom is made by cutting a 6 3/4 inch square piece of card stock and then scoring it at 1 3/4 inches on all four sides. Then you cut to the score line on the scored lines twice on only two sides. Making sure the two sides you choose are opposite one another. Once that is done, you can fold it and adhere the sides with sticky strip to themselves. You do the same thing to create the box lid only cut your card stock piece smaller. The lid dimensions are 4 3/4 inches square. Then you score it at 3/4 of an inch on all four sides. Follow the instructions for the box bottom for assembly. Does it sound confusing? Once you make one you will see how very easy it is to make.
3 x 3 Card Recipes:
  • Stamp Set - Circle of Friendship
  • Inks - Blue Bayou and Rose Red
  • Papers - Blue Bayou, Soft Sky, Rose Red and Very Vanilla card stocks. Cutie Pie and Afternoon Tea Designer Series papers
  • Embellishments - Soft Sky and Purely Pomegranate Double Stitched Grosgrain ribbons ( Both of these are no longer in stock now. They have completely sold out!)
  • Tools - 1 inch, 1 1/4 inch and 1 3/8 inch Circle punches and dimensionals.

These little gift card sets would be a great way to use up those designer paper scraps that I'm sure we all have too! You could substitute any little stamp set with greetings or quotes or just use one with little flowers or something! I think these would be neat little gifts. I might make one for my kids teachers at the beginning of the school year. I can't believe that school is going to start for us in about 3 weeks! My how the summer has flown by!

I plan to share some things I've made using sets that are on the discontinued list with you this week. I've also noticed that I am getting close to 1000 hits on my blog! Yay! When I get to 1000, I will have a drawing online for some blog candy!! Whoo Hoo! Be sure to check back and leave a comment on the post when I announce the drawing! It will probably be sometime this week!

Thanks for stopping by! I hope that you were inspired to go stamp something!

Happy Stampin'

Karen

Friday, July 11, 2008

Fresh Cuts Note Cards

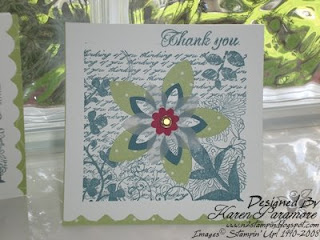
This card was one that we made at my "eScape the Ordinary"event back in June. The cards are the 4x4 Fresh Cut Note cards that will be in the upcoming 2008 Fall & Winter Idea Book! The stamp set is also called Fresh Cuts and will be in the new catalog! I can't wait till it comes out! There are going to be some great things in it! The center of these note cards "pop" put to reveal a negative flower shape while leaving a small flower shape in the center. The designer series papers look really pretty behind it. The stamp set is all one piece other than the greeting of course. To create the scalloped edge I used my corner rounder. All you need to do to create a scallop edge is to remove the plastic guide from around your corner rounder and put your card stock straight in and punch. I usually start in the center of the edge that I'm scalloping. Then punch and move the punch over to the edge where you did your last punch and punch again. Repeat doing that until you reach the end of your card stock. Be sure to do the other side of your first punch too. It is very simple to do but can be a bit tedious. The more you practice this the better you get. However, in the upcoming catalog there is going to be a punch that will give you a scalloped edge by punching all at once! I can't wait to get my hands on that! I hope that it will be easy to use! I hope it will be easy scalloping!
I got the idea from this card on the SU demonstrator web site. The original was designed by a demonstrator named Marie McClellan. I like the color combination of the Celery and the Blue Bayou and the "pop" of Pomegranate. It is sad to see those two colors soon retiring.
Card Recipe:

  • Stamp Set - Fresh Cuts
  • Papers - Whisper White Fresh Cut Notes, Certainly Celery Designer Series Papers, Blue Bayou and Purely Pomegranate card stocks and Vellum Card Stock
  • Inks - Blue Bayou Classic ink pad
  • Embellishments - Rhinestone Brad
  • Tools - 5 Petal Flower punch, Boho Blossoms punch and 1/16" hole punch

This card was really easy to whip together. It saves time having the notes already cut and ready to go and they also come with an envelope. I also love using the decorative papers. They can make any project look well put together because they coordinate with our SU colors. I hope you liked the card today. Thanks for stopping by! Go stamp something!

Happy Stampin' !

Karen

Thursday, June 19, 2008

Apron Card

This is another fantastic card made with the "Tart & Tangy" stamps set. I just love this set! Remember to get your own "Tart & Tangy stamp set, you have to order it by the end of June! I love the "Summer Picnic" decorative paper that matches this set too. This Apron card is one that we made at my "Tart & Tangy" Technique class earlier this month. I cased the original card and it can be found here on Linda McClain's wonderful blog site, LMac's Catered Crops. She has a hand drawn pattern for this card on her link. I think this card would be great for a recipe swap or an invitation to a party of some kind, don't you? I just love it! What do you think?

Card Recipe:


  • Stamps - Tart & Tangy
  • Papers - Bashful Blue, Old Olive and Whisper White Card Stocks, Summer Picnic Designer Series papers
  • Inks - Real Red and Old Olive Stampin' Write Markers
  • Embellishments - Old Olive Polytwill ribbon, Red Gingham ribbon and Bold Bright buttons
  • Tools - 1/8" Hole punch, Rounded Tab punch, Scallop punch, 1 3/8" Circle punch, 1 1/4" Circle punch, Corner Rounder and Crystal Effects

Thanks so much for stopping by today! I will be very busy the next few days getting ready for my "Mystery Hostess" party so I may not post again until it is over! It is one of my favorite events that I hold! Everyone seems to like it too! Door prizes all around!

Happy Stampin'

Karen

Tuesday, June 17, 2008

Thanks For Our Teachers!

This is a card that I had made back in April for a group of teachers that I was working with. I had seen versions of this card on a few sites that I visited but the original card can be seen here on Carol Frerichs site. She has so many great samples to see. The card she made is a 4 x 4 square card but I made mine a standard greeting card size. I thought that this would be perfect to do with my group of teachers. The technique for this card is called the chalkboard technique. This is a neat technique that I had wanted to try. I had originally seen the directions for this technique at SplitCoast Stampers. The tutorial is by the ever talented Beate Johns. The link to the tutorial at SplitCoast Stampers is here.
What you do is stamp the solid image with the white craft ink and then use sponge daubers to add the pastels right on top of the stamped images. The chalks adhere to the ink. You then use the swiffer cloth to remove the chalks from the areas around your stamped image where you don't want the chalk to be. This is a really fun technique to do and a very simple card to put together.
I also made one of these cards for my daughter's preschool teacher as a "thank you" during teacher appreciation week in May. She really liked it.

Card Recipe:

  • Stamps - Tart & Tangy and Phrases for a Friend
  • Papers - Basic Black, Whisper White and Old Olive card stocks. Summer Picnic Designer Series paper
  • Inks - Basic Black Classic Ink pad and Whisper White Craft Ink pad
  • Embellishments - Vintage Brads, Old Olive Poly-twill ribbon, Red and Black Gingham ribbons
  • Tools - Stampin' Pastels, Sponge Daubers and a swiffer cloth

I hope you like this card. You should try this technique out for yourself and let me know what you think about it. It is really very easy to do.

Thanks for stopping by!

Happy Stampin'

Karen

Thursday, June 12, 2008

Tart and Tangy Class Samples

Here is another sampling of what we made at my Tart & Tangy Technique Class this past weekend. Not only did we make 3 cards using different techniques but we also made this set of 6 greeting cards with a gift box to hold them. The cards and the box are fairly simple to make. The general idea and the box itself I cased from the very talented Nancy Riley at iSTAMP. She has so many great ideas and samples on her blog. You can view her Tart & Tangy class samples here . She got her idea for this gift set from another very talented demonstrator Jackie Pedro at The Scalloped Edge . You can view her class samples here . She also has wonderful samples on her site. I have both of these very talented ladies listed on my blog list and I visit their sites often. On both Nancy's and Jackie's site they have posted a link to the box directions that were originally from Holly McMillen. I think it is great that talented people are willing to share ideas with one another.

Gift Set Recipe:

  • Stamps- Tart & Tangy
  • Papers- Bashful Blue, Real Red, Old Olive, Pumpkin Pie and Whisper White card stocks. Summer Picnic Designer Series papers
  • Inks- Pumpkin Pie ink pad and Old Olive and Real Red Stampin' Write markers
  • Embellishments- Real Red and Bashful Blue Striped Grosgrain ribbon and Earth Elements Brads
  • Tools- 1-1/4" Circle punch, 1-3/8" Circle punch, Scallop punch, 1/16" hole punch, Sticky Strip and dimensionals

I have a couple of other cards to share with you from this Tart & Tangy Technique class but I'll save them for another day. I hope you enjoyed seeing this gift set. Just think of the nice gift card sets you could make using this idea but changing the stamp sets! The possibilities are endless!

Thanks for stopping by today!

Happy Stampin',

Karen

Monday, June 9, 2008

"Cherries Jubilee"


Okay, SO this isn't Cherries Jubilee but the card does have cherries on it! They are so very yummy looking...and they make me happy. Kind of reminds me of summertime! This card showcases the cherry stamp out of the Tart & Tangy stamp set which is still available for purchase till the end of June. I also added a little shine on the main image with the Crystal Effects. I don't think you can tell that from the photo.
I just love this Tart & Tangy stamp set and the Summer Picnic Designer Series papers to coordinate so well with it! It is such a fun set to use! I just had a class this past weekend that featured this stamp set and everyone who attended received this set as part of their card kit. Maybe I'll post some of those card samples that we made sometime later this week. Here's what I used for this one. Enjoy!

Card Recipe:
  • Stamp Set- Tart & Tangy (From Occasions Mini catalog)

  • Papers- Real Red, Basic Black, Old Olive and Whisper White Card Stocks. Summer Picnic Designer Series Paper
  • Markers- Real Red and Old Olive

  • Embellishments- Real Red Striped Grosgrain Ribbon

  • Tools- White Gel Pen, 1 1/4" Square Punch, 1 3/8" Square Punch, Crystal Effects and Dimensionals

I would like to say thanks to everyone for the kind comments about my blog. It is a learning experience for me. I hope that you enjoy it as much as I am enjoying it! I hope to add a calendar link soon so that you can view my upcoming class schedule and see what things I offer in the way of "Classes by Mail" too. Please be sure to leave me a comment about my blog and this new card and feel free to contact me with any questions you might have!


Happy Stampin'


Karen