 Just a quick post today. I seem to have a headache that just won't go away! Not even with meds!


 Just a quick post today. I seem to have a headache that just won't go away! Not even with meds!
 So here is the post for the nugget candy box. The items shown to the left are what I used to create the box. I hope that you will be able to understand my tutorial. Refer to the pictures as you read the directions. Hopefully that will help you.
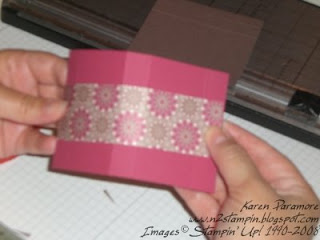
 Be sure to trim tabs at an angle because this makes them easier to work with. You will have four tabs, two short ends and two longer ends when you are finished trimming your box base. To assemble it, apply Sticky Strip to the base as shown in the picture below.
 Fold tabs in and attach to the longer sides of the box base and fold all sides down on scored lines to be stuck on the sticky strip pieces. This will complete your box base.
 for mine. Score this piece at 2 1/4" and then 4 1/2". Turn card stock piece around 180 degrees and score again at 2 1/4" and then 4 1/2". Adhere the designer paper piece that is cut 1 1/2" by 5 1/8" to the scored card stock piece. Using sticky strip, adhere one side flap to the other to create a rectangle shape open ended slider for your box base.
 What a nice gift this is to make! It makes even simple chocolates seem so very special!

Good Luck! Thanks for stopping by!
Happy Stampin'
Karen


 Right? Everyone scrambled to fill their bag with goodies when the pinata was opened! It was such a fun day! Everyone enjoyed the projects we made as well! "Thank you ladies for making the day so special for me!" "I love and appreciate you all so much!": )
 She loved it! It is so neat that Stampin Up is now going to have a whole catalog in Spanish!
  ven once...how sad is that? So I decided to use it even though no one could order it. Maybe it will show up in the new catalog! I'm not going to post a card recipe for these cards but I am going to post the directions for the nugget box and include pictures on where to cut it and where to glue it. I'll try to post that later today! I also have reached over 1000 hits on my blog so I'll post info about that on my next post as well! I have a great hostess stamp set bundle to give away! How Fun!
Hi all,
I'm busy this week getting ready for my annual "Hostess Appreciation" event! I have lots of neat surprises in store for my hostesses this year! We always have
a super fun day!
Today I want to share these four cards with you. All of them use the soon to be retired set "Be Happy"! I also used some On Board pieces as well as some Hodge Podge hardware, buttons and ribbons for embellishments.

 to be retired! That is a sad thing! It is a fun set to use too.
 It would be a great set to add to your collection but remember that you only have until August 10th to get it! Email me if you are interested in getting it! I hope these cards inspire you to go stamp something! Enjoy!
 Happy Monday to you!
Today I wanted to share with you these wonderful little 3x3 note cards and a gift box to put them in! Wouldn't these make a neat gift for someone? They are so super easy to make too. I used a combination of papers on mine. Mainly the Cutie Pie paper but also a little bit of the Afternoon Tea paper because it went so well with the Soft Sky card stock and the Blue Bayou that I used too. The Afternoon Tea paper is no longer available because it was in our last mini catalog.
The Cutie Pie paper and the two blue colors of card stocks are all going to be retired as of August 10th. The stamp set that I used will also be retired then too. It is called "Circle of Friendship". If you are interested in purchasing any of these products, send me an email and I would be happy to order them for you!
 cutting a 6 3/4 inch square piece of card stock and then scoring it at 1 3/4 inches on all four sides. Then you cut to the score line on the scored lines twice on only two sides. Making sure the two sides you choose are opposite one another. Once that is done, you can fold it and adhere the sides with sticky strip to themselves. You do the same thing to create the box lid only cut your card stock piece smaller. The lid dimensions are 4 3/4 inches square. Then you score it at 3/4 of an inch on all four sides. Follow the instructions for the box bottom for assembly. Does it sound confusing? Once you make one you will see how very easy it is to make.
These little gift card sets would be a great way to use up those designer paper scraps that I'm sure we all have too! You could substitute any little stamp set with greetings or quotes or just use one with little flowers or something! I think these would be neat little gifts. I might make one for my kids teachers at the beginning of the school year. I can't believe that school is going to start for us in about 3 weeks! My how the summer has flown by!
I plan to share some things I've made using sets that are on the discontinued list with you this week. I've also noticed that I am getting close to 1000 hits on my blog! Yay! When I get to 1000, I will have a drawing online for some blog candy!! Whoo Hoo! Be sure to check back and leave a comment on the post when I announce the drawing! It will probably be sometime this week!
Thanks for stopping by! I hope that you were inspired to go stamp something!
Happy Stampin'
Karen
Hello,
I have been trying all week to post a list of the discontinued accessories and to no avail I can't make it work!! I have spent hours upon hours and I don't know what I am doing wrong! It is so frustrating to me! All I want to do is cry! I can however, make a copy of it an send it in an email format to you. So if you are interested in receiving a copy of it just let me know. Other demonstrators have a copy of it on their blog site and they saved it as a pdf file. I just can't seem to do so! Others also have copied and pasted it onto their blog but when I try it just becomes a jumbled mess! 
(All of the Hodge Podge Hardware kits have sold out as well as some of the "In Color" Double Stitched Ribbons.)


Card Recipe:
Instructions for the envelope:
To create the envelope for this size card you use a regular medium size envelope from Stampin" Up! I'm not sure if that is the standard A-2 size or not. If you know, let me know. Anyway, you seal the envelope closed. Then using your paper trimmer, trim off 1 1/2" from one of the sides of the envelope. You are left with a sort of pocket envelope. Cut a piece of decorative paper to make your envelope flap with. Cut it to 3" x 4 3/8" and then "lightly" score it at 1 inch. The smaller flap you adhere to the front side of your pocket envelope and the longer flap is what you wold use to seal your card in the envelope with. I rounded the two corners on that longer flap too. I thought it gave it a nice touch. Try to make your own envelope for a 4 x 4 card and let me know how it turns out.
Happy Stampin'
Karen
Here are two more samples that I have to share using the Fresh Cut Notes and Fresh Cuts stamp set. These were also made at my "eScape" event.
Card Recipe:
 ges
gesI think that I like this card better than the first one. Which one do you like best? These note cards will not be available again until the new catalog comes out! I can't wait to see all of the fun new things that will be in the upcoming 2008 Fall & Winter Idea Book & Catalog! If you would like to get a copy of the new catalog please email me. I would be happy to share with you how you can get a copy of your very own.
This is what I used to make this card.
Card Recipe:
I have another sample to share with you using the Fresh Cuts stamp set but this time I'm not using the Fresh Cut Notes. I'll post that sample tomorrow. Thanks for stopping by today.
Happy Stampin' !
Karen
This card was one that we made at my "eScape the Ordinary"event back in June. The cards are the 4x4 Fresh Cut Note cards that will be in the upcoming 2008 Fall & Winter Idea Book! The stamp set is also called Fresh Cuts

I got the idea from this card on the SU demonstrator web site. The original was designed by a demonstrator named Marie McClellan. I like the color combination of the Celery and the Blue Bayou and the "pop" of Pomegranate. It is sad to see those two colors soon retiring.
Card Recipe:
This card was really easy to whip together. It saves time having the notes already cut and ready to go and they also come with an envelope. I also love using the decorative papers. They can make any project look well put together because they coordinate with our SU colors. I hope you liked the card today. Thanks for stopping by! Go stamp something!
Happy Stampin' !
Karen
Okay, so that was probably way more than anyone ever cared to know about me! Right?
So here are the 7 very talented ladies that I am tagging. Please be sure to check out their sites. You will find so many great ideas from their sites. Even though I have never met any of these ladies they have all been great inspirations to me.
Thank you ladies for all your inspiration and your commitment to share it with others!
Have fun being tagged!
Happy Stampin' !
Karen
My kids and I we
 We also ate dinner at a local restaurant called "The Reef". It was very delicious! The picture below is one that I took from the outside of the restaurant. What a pretty view and so relaxing!
 In honor of my beach trip, I thought I would share this card with you today. It's a Flip Flop!We made this one at the Mystery Hostess party a couple of weeks ago. I cased the one that I found from Lorri Heiling over at Confessions of a Stampin Addict. You should check out her site. She has so many great ideas! You can click here to view her version of the flip flop card. She does not have instructions or anything for it so I just tried to copy her picture on how she folded it and cut it out. I think it is really cute because it has "straps"!
Hope you're having a great day! Thanks for stopping by today.
Happy Stampin' !
Karen
This is an adorable card and so very easy to make! It looks like those yummy orange creamsicles that I always enjoyed eating as a kid. Brings back good memories! You could make this same card in other "ice cream flavors" as well. Imagine a fudge bar or strawberry bar. Oooh yummy!
I've seen a lot of these ice cream bar cards around but I cased my version of this card from Patty Bennett. She has a great tutorial on the card size and how exactly to make it here.
Card Recipe:
It is a little hard to t
Also the inside white card stock piece is mounted on the inside with dimensionals.
The yellow strip on the ribbon was colored with the Yo Yo Yellow Stampin' Write marker. A simple but nice touch, don't ya think?
This is another one of the cards that we made at the Mystery Hostess party a couple of weeks ago. I've got one more card to show you that we made at that party...it is a card in the shape of a flip flop. Maybe I''ll post that tomorrow along with some of the beautiful pictures from the beach from my "mini" beach trip!
Hope everyone is having a great holiday weekend! Did you fit any stamping in?
Happy Stampin'
Karen